
As we saw in part I of our look at bathroom bathing design, the smallest room in your home could pose the biggest risk to you and your loved ones. Let’s continue our look at design considerations in Bathroom Bathing Design: 10 Things to Consider-Part II.
#3 – Wall Tile Selection
Here is one area you have a lot of leeway in choosing something for a bath or shower wall surround. No matter what kind of front facing material you pick you will need to start with a water proof membrane and cement board. These will help stop leaks into the back side of your walls and resist mold and mildew. Most people tend to use a tile, probably for its thousands of color and pattern combinations, but others may choose an acrylic or fiberglass surround for their shower or tub walls.
Fiberglass
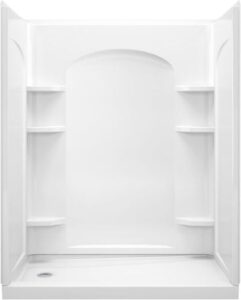
Fiberglass can be molded into shower or tubs walls that can be easily sealed together for a cohesive look or premolded into one solid unit to fit your entire bath or shower surround area. In addition to the premolded surrounds they can also include grab bars or ledges, molded soap dishes, shelves to hold bath accessories and premolded seats. They are fairly low maintenance and clean up quickly. Premolded shower inserts can easily replace an existing bathtub in styles with left, right and center facing drains.
Tile
Tiling can cost as much or more than fiberglass surrounds but you have a greater choice of colors and styles from which to choose. Tile also requires additional maintenance as grout needs cleaning and re-sealing over time. Note: if you seal your grout and tile well after installation, cleaning will be easier and your walls will last longer.
Tile is measured in PEI (Porcelain Enamel Institute) evaluating its strength and durability for a particular application. The PEI rating does measure quality or value of the tile. Here is a chart to help determine the suitability of a tile for your projects (1):
| PEI | Use | Recommended Areas |
| 1 | No foot traffic | Wall use only in residential and commercial applications. This type of tile should never be used under foot. Shower surrounds are a typical PEI-1 tile. |
| 2 | Light foot traffic | Both wall use and flooring areas that receive little traffic, such as residential bathrooms. |
| 3 | Light to moderate foot traffic | Countertops, walls, and floors that receive normal foot traffic are best suited for PEI-3 rated tiles. This is a good, general purpose tile for all residential (but not commercial) uses. |
| 4 | Moderate to heavy foot traffic | All residential applications as well as medium commercial and light institutional work with PEI-5 rated tile. |
| 5 | Heavy to extra heavy traffic. | All residential and heavy commercial and institutional foot traffic. Typically this is used only for flooring and is rarely attractive enough for interior residential applications. |
Grout
Grout is used to fill the gaps around your tile once you have arranged them on the wall and floor in your desired pattern. It is an important element to sealing your tile in place and preventing leaking into your floors and walls. There are several types of grout: unsanded, fine sanded, quarry type, and epoxy.
- Unsanded grout for ceramic tile: This is used for wall tiles where the grout joint is less than 1/8” wide.
- Finely sanded grout for ceramic tile: This is used for floor tiles where the joints are 1/8” to 3/8” wide.
- Quarry-type grout for ceramic tile: This is the same as finely sanded grout for ceramic tiles except that a coarser grade of sand is used. The quarry-type grout for ceramic tile is used for joints that are 3/8” wide to 1/2” wide such as those used with Saltillo tiles.
- Epoxy grout for ceramic tile: This consists of an epoxy resin and hardener. Epoxy grout for ceramic tile is highly resistant to stains and chemicals and has a tremendous bonding strength. It is ideal for countertops and other areas susceptible to stains. (2)
Grout can be equally as important as the color and patterned tile you choose to put on your walls and floors. Grout comes in a variety of colors and can be applied in varying widths, usually 1/16 up to 1/2 inch in width. Spacers in the width chosen are used to set the space between your tile to ensure even spacing is maintained while you are laying the tile. Here are some things to consider when choosing and applying grout:
- The wider the width the better you can align your tile – recommendation is 3/16 inch
- The wider your width the courser your grout must be to securely anchor the tiles – the sand prevents the grout from shrinking and cracking
- Use a darker grout to make your tile color pop or use a close match in color to create a more uniform look
- Use a good sealer over top the grout to help prevent staining, molding and mildew
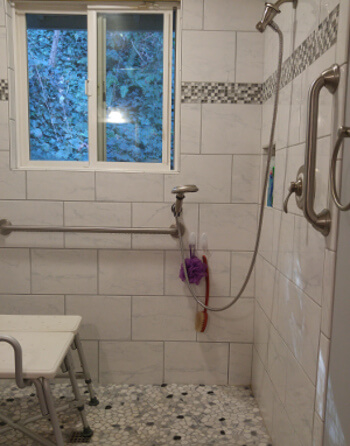
As far as PEI ratings go you can basically use any tile for your walls. However, as a rule of thumb, the higher the PEI and tile composite (natural stones), the more costly the tile will be. This can have a big impact on your project budget. Also consider how much tiling you will need to complete your shower surrounds and flooring. We chose a medium priced tile rated PEI 1 since there is no foot traffic for this project with a matching glass tile accent piece for decorative look.
Sometimes you can choose a somewhat plain style tile with a lower cost, such as our gray and white wall tile, and arrange them in a pattern that will make the whole wall pop. The placing of the tile in a subway pattern is more visually interesting than a plain stacked tile look. Our tile is mostly white, which also keeps the whole bathroom light and bright. Note: A darker tile will make a room look smaller and require more lighting to achieve the same room brightness as using a lighter tile color.

Sanded grout mix

Premixed grout
We wanted to use one color of grout on our walls, shower floor and bathroom floor. It turned out great! A wider grout line in the shower makes the subway pattern more defined by giving high contrast against the lighter tile. The same grout on our pebble shower floor and glass mosaic blends in with the color pattern so as to let the tile pattern be the most visible element. And a wider grout line on our dark gray planked flooring makes the plank design stand out by framing it with the lighter grout color. So, with one grout color we were able to achieve three different effects. Everything is sealed and has been easy to maintain!
#4 – Shower Mounts or Dual Shower Heads
Having an accessible shower head is vital to your bathing activity. It should be located within arms reach and able to mount while you are washing. Here are things to consider when installing shower or tub controls:
- Shower controls should be 38 to 48 inches off the floor and should either be located on the opposite wall of a seat or chair or on a side wall if the front wall in not accessible
- Shower hoses should be greater than 59 inches in length and able to move out of the way not blocking access to the grab bar(s)
- Shower controls should be a lever and not a knob for those with difficulty grasping and turning knobs
There are a couple options when considering a shower head:
- A fixed shower head is acceptable if used on a sliding bar that can be lowered to no lower than 48 inches above a finished floor
- A dual head shower setup is acceptable if the non-fixed shower head can be removed from the mount and used by a seated person
- A single removable (non-fixed) shower head is also an acceptable solution when used with a lower mounted shower holder. (Do not leave the shower head dangling in the tub or shower as it can become a tripping hazard when moving around or exiting the bath!) (We chose this option for our shower as it works great for a seated person without having to deal with an upper diverter of the shower head.)
- Make sure the water stream is not too strong or is adjustable for those with delicate skin
- Make sure someone adjusts the water heater temperature so the bather does not get scalded

Suction cup shower head mount
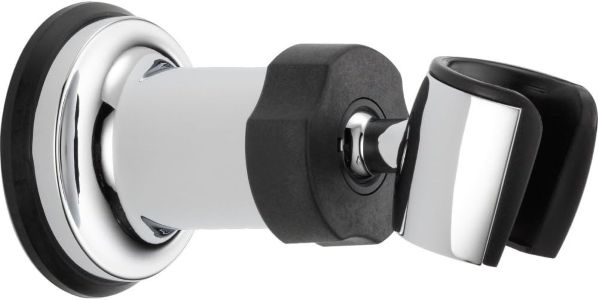
Wall mounted shower head holder
#5 – Flooring and Drain Selection
Flooring is probably the one thing you want to pay the most attention to as slipping is not an option!
Flooring
Shower flooring will vary depending on your bathing needs. If you funding your own remodel then you do not need to follow ADA (Americans with Disabilities Act), which is required for all commercial bathroom designs or government agencies funding your project, but it is highly recommended to hire a contractor or become knowledgeable on ADA guidelines to build the best “accessible” bathroom possible.
Shower flooring with depend on the type of shower area you are designing. (See section 8: Access Barriers.) If you are creating a “wet room” then all your bathroom flooring (and perhaps walls) will probably be the same. If you are creating a barrier-free or low barrier shower area you might use two different flooring solutions – one for the shower and another one for the rest of the bathroom floor. Whether you choose to use one cohesive flooring solution or two different ones your flooring needs to be textured for slip resistance, be durable and easy to maintain.
Slip resistance is measured by a Coefficient of Friction (COF) factor and should be above .60 to meet ADA standards. You can read more in our previous article on bathroom safety. Your contractor or home building store flooring department should be able to help you with flooring that meets ADA standards. Remember – slipping is not an option!
Shower floors can be made of a preformed pan or custom built.
- Preformed pans – pans are usually made of premolded fiberglass with texturing that insert into the bottom of your shower floor. They come in a variety of sizes and colors to fit your individual shower space. They can also be custom made to fit a unique space. They can be made from a mixture of real ground stone and resin for more of a custom look of real stone. They come in choices of barrier heights and drain locations (left, right or center).
- Custom shower floors – these are usually built from the sub-flooring on up with waterproof members and meshing to prevent leakage and anchor your tile selection in place. There are a variety of tile types and colors to choose from, certainly enough to match your decor needs.

We chose a pebble floor, which really grips the feet and is highly slip resistant. It also looks great with the rest of the decor! The only downside to using a smaller pebble floor is it requires a little more attention when cleaning, but we don’t mind. The trade off is worth it!
We also chose a different bathroom tile that does meet ADA standards to highlight the shower area tile (COF of .60). It is a wide planked (12×24 inches), easy to maintain and looks great with the decor. Who says creating a safe bathing environment has to look institutional or boring!
Drains
The size of your new drain may depend on the size of your existing drain pipe, the anticipated amount of water you plan to generate in your shower and whether you plan to create a “wet room”. Many can use a standard round drain for just a shower. Others may choose a larger round or square one for better drainage or aesthetics. If you are creating a “wet room” then you may want a larger drain to collect water. Some of these drains can be disguised to fit in your decor so they are highly functional and aesthetically pleasing at the same time.
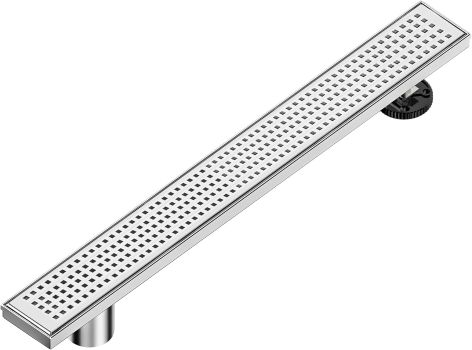
Linear shower drain
#6 – Shower Tool Accessibility
Undoubtedly people will have at least one showering accessory they will need to use during a bathing activity. Those accessories might include a scrubber sponge or long handled back and leg brush. Accessories should be close enough to reach yet be securely tucked away to avoid becoming a tripping hazard. Command strips by 3M specifically designed for wet tub and shower areas are a great solution to hang accessories and can be re-positioned should you want to change their location down the road. We use them in both our shower and bathtub areas and they have worked great for well over a year now.
Don’t worry if the holes on your brushes or sponges don’t fit over the hook. We took some simple yarn and made a large loop for our brush through the smaller hole. Now it hangs at the perfect height and is easy to hang when finished.

We would really like to hear your comments and design ideas you used to make your bathing experience safer and easier. Please leave your comment below.
To Your Improved Health, Independence and Quality of Life!
Please continue reading more in this series at:
- Bathroom Bathing Design: 10 Things to Consider-Part I
- Bathroom Bathing Design: 10 Things to Consider-Part II
- Bathroom Bathing Design: 10 Things to Consider-Part III (next)